I bought a digital video camera over 3 years ago (right after the birth of my first child) but have only now figured out how to best handle the video it produces.
Video is not like still pictures; you can't just print out the stills you like and stick them in an album. Ideally, after you've shot some video footage, you need to become an editor and make an effort to take your best footage to create an enjoyable movie. One of these days I'll get around to doing that...
In the meantime, I wanted to a) be able to see the video I've shot and b) store it for some future time when I might want to create some edited movies.
The procedure:
Step 1
Video capture; Transferring the video from camera to PC.
The important point of the transfer is to not lose data while transferring. In order to do this, store the video on the PC as DV AVI. This means that the stored video is the full original size and completely uncompressed. The downside of capturing the video in this format is that it takes up a lot of space (about 217 megabytes for 1 minute of video). Though with the low prices of hard disks today, this is not a big problem for most people.
I recommend using a simple and lightweight (and free) application for transferring called WinDV, detailed usage help here. WinDV works great (most importantly, it never drops frames). Once small gotcha I've noticed with it though is that the first clip saved has the current date/time, rather than the date/time when the video was recorded. Make sure you rename that clip to the correct time (which WinDV displays correctly on the screen while transferring) to help you to sort out the clips at a later time.
Step 2
Encoding (compressing)
The raw footage captured in step 1 has some problems.
1. It's huge. In its uncompressed form, only about 20 minutes will fit on a DVD.
2. It can't be easily viewed. A DVD with the raw footage can't be put into a DVD player and viewed.
3. It's interlaced. Check out the site 100fps.com for more information about what that means.
To solve these problems, I encoded the footage using the latest DivX codec (version 6.6.1), with the following settings:
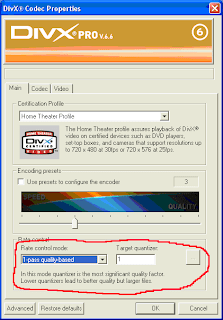

Once the video is saved in this format, it is much smaller (about a 1:6 ratio) and playable on a DVD player that reads the DivX format. The quality of the encoded video is also excellent; I don’t see any degradation in quality between it and the raw footage, though there doubtless is some.
In addition to the video compression, I also compressed the audio using LAME MP3 at 128kbps CBR.
The encoding work is done with the free app VirtualDub. I found a short script to remove the tedium of creating the VirtualDub encoding jobs
at this site, “Scripted VirtualDub Job Creation”.
This is the contents of the VirtualDub configuration file used to duplicate my settings:
VirtualDub.audio.SetSource(1);
VirtualDub.audio.SetMode(1);
VirtualDub.audio.SetInterleave(1,500,1,0,0);
VirtualDub.audio.SetClipMode(1,1);
VirtualDub.audio.SetConversion(0,0,0,0,0);
VirtualDub.audio.SetVolume();
VirtualDub.audio.SetCompressionWithHint(85,32000,2,0,16000,1,12,"AQAEAAAAQAIBAAAA","LAME MP3");
VirtualDub.audio.EnableFilterGraph(0);
VirtualDub.video.SetInputFormat(0);
VirtualDub.video.SetOutputFormat(7);
VirtualDub.video.SetMode(3);
VirtualDub.video.SetFrameRate(0,1);
VirtualDub.video.SetIVTC(0,0,-1,0);
VirtualDub.video.SetCompression(0x78766964,0,10000,0);
VirtualDub.video.SetCompData(145,"LWJ2MXEgMSAtdmJ2IDQ4NTQwMDAsMzE0NTcyOCwzMTQ1NzI4IC1kaXIgIkM6XERvY3VtZW50cyBhbmQgU2V0dGluZ3NcRE1SXEFwcGxpY2F0aW9uIERhdGFcRGl2WFxEaXZYIENvZGVjIiAtYiAxIC1wIC1uZiAtcHJvZmlsZT0zIC1kZWludGVybGFjZT0xAA==");
VirtualDub.video.filters.Clear();
VirtualDub.audio.filters.Clear();
Step 3
Burning onto DVD
I burned the encoded DivX AVI files onto DVDs using the omnipresent Nero.
The final DVDs are ready for viewing in modern DVD players which support DivX playback.


